状态管理 canvas 是根据状态来绘图的
状态:
描边/填充样式:strokeStyle, fillStyle, globalAlpha
线的样式:lineWidth, lineCap, lineJoin, miterLimit, lineDashOffset
阴影:shadowOffsetX, shadowOffsetY, shadowBlur, shadowColor,
字体样式:font, textAlign, textBaseline, direction
平滑质量:imageSmoothingEnabled
合成属性:globalCompositeOperation
当前变形
当前裁剪路径
Canvas 维护了一个状态栈 :
save() 将当前状态压入栈中。restore() 弹出栈顶状态,恢复之前的状态。
1 2 3 4 5 6 7 8 9 10 11 12 13 14 15 16 17 18 19 20 21 22 23 24 25 ctx.fillStyle = 'red' ctx.strokeStyle = 'blue' ctx.lineWidth = 6 ctx.save () ctx.beginPath () ctx.rect (50 , 50 , 100 , 50 ) ctx.fill () ctx.stroke () ctx.fillStyle = 'green' ctx.strokeStyle = 'red' ctx.lineWidth = 10 ctx.beginPath () ctx.rect (200 , 50 , 100 , 50 ) ctx.fill () ctx.stroke () ctx.restore () ctx.beginPath () ctx.rect (350 , 50 , 100 , 50 ) ctx.fill () ctx.stroke ()
变形 变形本质是对坐标系 的变换,可以实现旋转、缩放、平移等效果。
变形效果只影响后续的绘制,不会影响之前的绘制。
平移 translate translate(x, y) 移动画布的原点到原来的 (x, y),即整个坐标系平移了 (x, y)。
图形会根据新的原点重新绘制。视觉上看,图形在原来的位置上移动了 (x, y)。
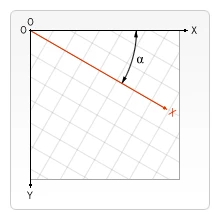
旋转 rotate rotate(angle) 以原点为中心旋转画布,angle 旋转的弧度 ,正值顺时针。
缩放 scale scale(x, y) 缩放画布,x 为水平缩放比例,y 为垂直缩放比例。
如果是负数,镜像反转。
transform(a, b, c, d, e, f) 变换矩阵,可多次调用叠加变换效果。setTransform(a, b, c, d, e, f) 重新设置(覆盖)当前的变形效果,包括 translate、rotate 等。resetTransform() 重置变换矩阵为单位矩阵。等同于 setTransform(1, 0, 0, 1, 0, 0)。
变换矩阵的描述 1 2 3 4 5 6 [ 𝑎 𝑐 𝑒 𝑏 𝑑 𝑓 0 0 1 ] [ x' ] [ a c e ] [ x ] [a * x + c * y + e] [ y' ] = [ b d f ] * [ y ] = [b * x + d * y + f] [ 1 ] [ 0 0 1 ] [ 1 ] [ 1 ]
参数:
a (m11) 水平缩放,默认 1。b (m12) 竖直错切,默认 0。c (m21) 水平错切,默认 0。d (m22) 垂直缩放,默认 1。e (dx) 水平移动,默认 0。f (dy) 垂直移动,默认 0。
常见效果 1、移动: 控制 e、f 参数。
1 2 3 [ x' ] [ 1 0 e ] [ x ] [ x + e ] [ y' ] = [ 0 1 f ] * [ y ] = [ y + f ] [ 1 ] [ 0 0 1 ] [ 1 ] [ 1 ]
2、缩放: 控制 a、d 参数。
1 2 3 [ x' ] [ a 0 0 ] [ x ] [ a * x ] [ y' ] = [ 0 d 0 ] * [ y ] = [ d * y ] [ 1 ] [ 0 0 1 ] [ 1 ] [ 1 ]
3、错切: 控制 b、c 参数。
1 2 3 [ x' ] [ 1 c 0 ] [ x ] [ x + c * y ] [ y' ] = [ b 1 0 ] * [ y ] = [ y + b * x ] [ 1 ] [ 0 0 1 ] [ 1 ] [ 1 ]
4、旋转: 需要控制 a、b、c、d 参数
1 2 3 4 x0 = r * cos α y0 = r * sin α x = r * cos(α+θ) = r * cos α * cos θ - r * sin α * sin θ = x0 * cos θ - y0 * sin θ y = r * sin(α+θ) = r * sin α * cos θ + r * cos α * sin θ = y0 * cos θ + x0 * sin θ
最终推导的公式刚好可以使用变换矩阵表示
1 2 3 [ x' ] [ cos(θ) -sin(θ) 0 ] [ x ] [ cos(θ) * x - sin(θ) * y ] [ y' ] = [ sin(θ) cos(θ) 0 ] * [ y ] = [ sin(θ) * x + cos(θ) * y ] [ 1 ] [ 0 0 1 ] [ 1 ] [ 1 ]
1 2 3 4 5 6 7 8 9 10 11 12 13 14 15 16 function rotate (angle ) { angle = (angle * Math .PI ) / 180 ; const s = Math .sin (angle); const c = Math .cos (angle); ctx.transform (c, s, -s, c, 0 , 0 ); } ctx.translate (200 , 200 ); for (let i = 0 ; i <= 18 ; i++) { ctx.save (); rotate (i * 10 ); ctx.globalAlpha = 1 / 18 * i ctx.fillRect (0 , 0 , 100 , 100 ); ctx.strokeRect (0 , 0 , 100 , 100 ); ctx.restore (); }
合成 globalCompositeOperation 设置在绘制新图形时应用的合成操作的类型。
即绘制新图形时,如何与画布上已有的图形 进行叠加。详见文档
展示所有合成类型:
1 2 3 4 5 6 7 8 9 10 11 12 13 14 15 16 17 18 19 20 21 22 23 24 25 26 27 28 29 30 31 32 33 34 35 36 37 38 39 40 41 42 43 44 45 46 47 48 49 50 const blendModes = [ "source-over" , "source-in" , "source-out" , "source-atop" , "destination-over" , "destination-in" , "destination-out" , "destination-atop" , "lighter" , "copy" , "xor" , "multiply" , "screen" , "overlay" , "darken" , "lighten" , "color-dodge" , "color-burn" , "hard-light" , "soft-light" , "difference" , "exclusion" , "hue" , "saturation" , "color" , "luminosity" , ]; blendModes.forEach ((blendMode, i ) => { const box = document .createElement ("div" ); const canvas = document .createElement ("canvas" ); canvas.width = 250 ; canvas.height = 250 ; const ctx = canvas.getContext ("2d" ); ctx.fillStyle = "rgba(255, 0, 0, 1)" ; ctx.fillRect (0 , 0 , 200 , 150 ); ctx.globalCompositeOperation = blendMode; ctx.fillStyle = "rgba(0, 255, 0, 1)" ; ctx.fillRect (0 , 50 , 100 , 200 ); ctx.fillStyle = "rgba(0, 0, 255, 1)" ; ctx.fillRect (50 , 100 , 100 , 100 ); const p = document .createElement ("p" ); p.textContent = i + 1 + "、" + blendMode; box.appendChild (p); box.appendChild (canvas); document .body .appendChild (box); });
类型 下面每四个一组,介绍不同类型的合成:
source-over 默认 。新图形绘制在原有图形上。source-in 仅绘制新图形与目标画布重叠的地方,其它都是透明的。source-out 在不与现有画布内容重叠的地方绘制新图形。source-atop 新图形绘制在原有图形上,但只在与现有画布内容重叠的地方绘制新图形。
destination-over 新图形绘制在原有图形下方。destination-in 仅保留现有画布内容和新形状重叠的部分。其他的都是透明的。destination-out 仅保留现有画布内容和新形状不重叠的部分。destination-atop 仅保留现有画布内容和新形状重叠的部分。新形状是在现有画布内容的后面绘制的。
lighter 重叠部分颜色值相加。copy 只显示新图形。xor 重叠处变为透明,其他地方正常绘制。multiply 重叠部分颜色值相乘。更黑暗。
screen 重叠部分像素被倒转、相乘、再倒转,结果更亮(与 multiply 相反)。overlay multiply 和 screen 的结合。原本暗的地方更暗,原本亮的地方更亮。darken 保留两个图层中最暗的像素。lighten 保留两个图层中最亮的像素。
color-dodge 将底层除以顶层的反置。color-burn 将反置的底层除以顶层,然后将结果反过来。hard-light 类似于 overlay,multiply 和 screen 的结合——但上下图层互换了。soft-light 柔和版本的 hard-light。不会导致纯黑或纯白。
difference 从顶层减去底层(或反之亦然),始终得到正值。exclusion 与 difference 类似,但对比度较低。hue 保留底层的亮度(luma)和色度(chroma),同时采用顶层的色调(hue)。saturation 保留底层的亮度和色调,同时采用顶层的色度。
color 保留了底层的亮度,同时采用了顶层的色调和色度。luminosity 保持底层的色调和色度,同时采用顶层的亮度。
前面几个还好理解,后面的,用到再说吧,看不懂。
裁剪 clip clip() 将当前创建的路径作为剪切路径。fillRule 为填充规则 。
1 2 3 void ctx.clip ();void ctx.clip (fillRule);void ctx.clip (path, fillRule);
剪裁只对后续的绘制生效。每次裁剪前应该 save() 保存状态,以便后续恢复。
1 2 3 4 5 6 7 8 9 10 11 12 13 14 15 16 17 18 19 20 21 22 ctx.fillRect (0 , 0 , 100 , 100 ); ctx.beginPath (); ctx.moveTo (100 , 100 ); ctx.lineTo (150 , 150 ); ctx.lineTo (150 , 100 ); ctx.closePath (); ctx.save (); ctx.clip (); ctx.stroke (); ctx.fillRect (0 , 0 , 130 , 130 ); ctx.restore (); ctx.fillRect (150 , 0 , 100 , 100 );
填充规则 fillRule 填充规则,一种算法,决定点是在路径内还是在路径外,即某一区域是否被填充。
nonzero 非零环绕规则,默认 。evenodd 奇偶环绕规则。
两个规则的差异体现在交叉点 的处理上。
fill、clip、isPointinPath 等方法可以传入 fillRule,以指定填充规则。
1 2 3 4 5 6 7 8 9 10 11 12 13 14 15 16 17 18 19 20 21 22 23 24 25 26 27 28 29 30 31 32 33 34 35 36 37 38 const t1 = new Path2D ();t1.moveTo (100 , 100 ); t1.lineTo (220 , 120 ); t1.lineTo (160 , 220 ); t1.closePath (); const t2 = new Path2D ();t2.moveTo (100 , 100 ); t2.lineTo (160 , 80 ); t2.lineTo (220 , 220 ); t2.closePath (); const path = new Path2D ();path.addPath (t1); path.addPath (t2); ctx.font = "20px 黑体" ; ctx.fillText ("分别绘制三角形" , 100 , 50 ); ctx.fillStyle = "red" ; ctx.fill (t1); ctx.fillStyle = "blue" ; ctx.fill (t2); ctx.fillStyle = "black" ; ctx.translate (200 , 0 ); ctx.fillText ("nonzero" , 120 , 50 ); ctx.fill (path, "nonzero" ); ctx.translate (200 , 0 ); ctx.fillText ("evenodd" , 120 , 50 ); ctx.fill (path, "evenodd" )
两个三角形路径均是顺时针。
nonzero nonzero 非零环绕规则,是默认的填充规则。顺+1逆-1,非0填。
规则: 选取任一区域内一点,发射一条无限长的射线,起始值为0,射线会和路径相交,如果路径方向和射线方向形成的是顺时针 方向则+1,如果是逆时针 方向则-1,最后如果数值为0 ,则是路径的外部,不填充,如果非0 ,则是路径的内部,填充。
evenodd evenodd 奇偶环绕规则。奇填偶不填。
规则: 起始值为0,射线会和路径相交,每交叉一条路径,计数+1,最后看总计算数值,如果是奇数 ,则是路径内部,如果是偶数 ,则是是路径外部。
控制像素 getImageData() 获取画布上指定矩形的像素数据。putImageData() 将 ImageData 数据(图片像素数据)绘制到画布上。createImageData() 创建一个新的、空白的 ImageData 对象。
获取像素数据 getImageData(x, y, width, height) 获取画布上指定矩形的像素数据。
返回 ImageData 对象,包含指定矩形的像素数据、宽度和高度。
1 2 3 4 5 6 7 const img = new Image ();img.src = "1.png" ; img.onload = () => { ctx.drawImage (img, 0 , 0 ); const imgData = ctx.getImageData (0 , 0 , img.width , img.height ); console .log (imgData); }
1 2 3 4 5 ImageData {data : Uint8ClampedArray (913936 ), width : 478 , height : 478 , colorSpace : 'srgb' } data : Uint8ClampedArray (913936 ) [12 , 83 , 161 , 255 , 12 , 83 , 161 , …] colorSpace : "srgb" height : 478 width : 478
data 是一个二维数组,每个元素的取值范围是 0 - 255 的整数,每四个元素 表示一个像素的 RGBA 值。
1 2 data : [[r1, g1, b1, a1, r2, g2, b2, a2, ......],...]
设置像素数据 putImageData() 将 ImageData 数据(图片像素数据)绘制到画布上。
1 2 3 void ctx.putImageData (imagedata, dx, dy);void ctx.putImageData (imagedata, dx, dy, dirtyX, dirtyY, dirtyWidth, dirtyHeight);
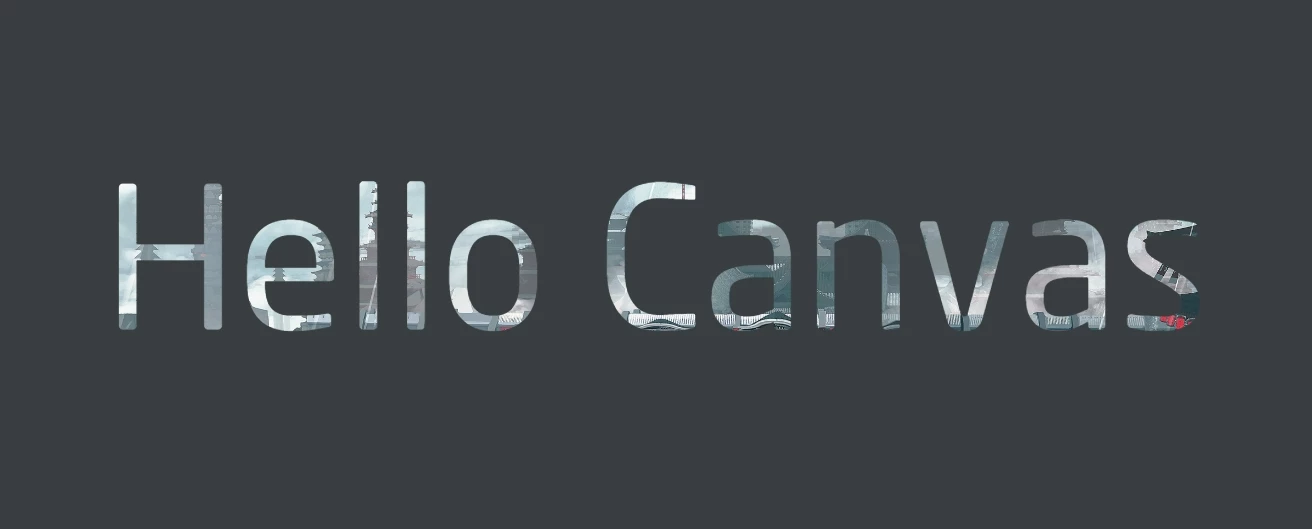
修改图像透明度案例:
1 2 3 4 5 6 7 8 9 10 11 12 13 14 15 16 17 18 19 20 const img = new Image ();img.src = "1.png" ; img.onload = () => { ctx.drawImage (img, 0 , 0 ); const imgData = ctx.getImageData (0 , 0 , img.width , img.height ); changeAlpha (imgData, 0.5 ); ctx.clearRect (0 , 0 , canvas.width , canvas.height ); ctx.putImageData (imgData, 0 , 0 ); } function changeAlpha (imgData, alpha ) { const data = imgData.data ; for (let i = 0 ; i < data.length ; i += 4 ) { data[i + 3 ] = data[i + 3 ] * alpha; } }
知道像素信息,还可以做滤镜效果,这需要不同的算法,后续再说。
动画 canvas 动画的本质是擦掉重画 和几何变换 。
requestAnimationFrame() 是做动画的核心 API。当系统准备好了重绘条件的时候,才调用绘制动画帧。一般每秒钟回调函数执行 60 次。
下面的案例涵盖了 canvas 动画的基本概念,如速度、边界、重复绘制。
自由落体小球 1、绘制小球:
1 2 3 4 5 6 7 8 9 10 11 12 13 14 15 16 17 class Ball { constructor (ctx, x, y, radius, color ) { this .ctx = ctx; this .x = x; this .y = y; this .radius = radius; this .color = color; } draw ( ctx.beginPath (); ctx.arc (this .x , this .y , this .radius , 0 , Math .PI * 2 ); ctx.fillStyle = this .color ; ctx.fill (); } } const ball = new Ball (ctx, 50 , 50 , 20 , "blue" );ball.draw ();
2、速率:
1 2 3 4 5 6 7 8 9 10 11 12 13 14 15 16 17 18 19 20 21 22 23 24 25 26 27 28 class Ball { constructor (ctx, x, y, radius, color, vx, vy ) { this .ctx = ctx; this .x = x; this .y = y; this .radius = radius; this .color = color; this .vx = vx; this .vy = vy; } draw ( ctx.clearRect (0 , 0 , canvas.width , canvas.height ); ctx.beginPath (); ctx.arc (this .x , this .y , this .radius , 0 , Math .PI * 2 ); ctx.fillStyle = this .color ; ctx.fill (); } move ( this .x += this .vx ; this .y += this .vy ; this .draw (); window .requestAnimationFrame (() => this .move ()); } } const ball = new Ball (ctx, 50 , 50 , 20 , "blue" , 5 , 5 );ball.draw (); ball.move ();
3、边界:
1 2 3 4 5 6 7 8 9 10 11 12 13 14 15 16 17 18 19 20 21 22 23 24 25 26 27 28 29 30 31 32 33 34 35 class Ball { constructor (ctx, x, y, radius, color, vx, vy ) { this .ctx = ctx; this .x = x; this .y = y; this .radius = radius; this .color = color; this .vx = vx; this .vy = vy; } draw ( ctx.clearRect (0 , 0 , canvas.width , canvas.height ); ctx.beginPath (); ctx.arc (this .x , this .y , this .radius , 0 , Math .PI * 2 ); ctx.fillStyle = this .color ; ctx.fill (); } move ( this .x += this .vx ; this .y += this .vy ; if (this .x + this .radius > canvas.width || this .x - this .radius < 0 ) { this .vx = -this .vx ; } if (this .y + this .radius > canvas.height || this .y - this .radius < 0 ) { this .vy = -this .vy ; } this .draw (); window .requestAnimationFrame (() => this .move ()); } } const ball = new Ball (ctx, 50 , 50 , 20 , "blue" , 5 , 5 );ball.move ();
4、加速度:
1 2 3 4 5 6 7 8 9 10 11 12 13 14 15 16 17 18 19 20 21 22 23 24 25 26 27 28 29 30 31 32 33 34 35 36 37 38 39 40 41 42 43 44 45 46 47 48 49 50 51 52 class Ball { constructor (ctx, x, y, radius, color, vx, vy ) { this .ctx = ctx; this .x = x; this .y = y; this .radius = radius; this .color = color; this .vx = vx; this .vy = vy; } draw ( ctx.clearRect (0 , 0 , canvas.width , canvas.height ); ctx.beginPath (); ctx.arc (this .x , this .y , this .radius , 0 , Math .PI * 2 ); ctx.fillStyle = this .color ; ctx.fill (); } move ( if (Math .abs (ball.vy ) < 0.1 && ball.y === canvas.height - ball.radius ) { return ; } ball.vy *= 0.99 ; ball.vy += 0.25 ; this .x += this .vx ; this .y += this .vy ; if (this .x + this .radius > canvas.width ) { this .vx = -this .vx ; this .x = canvas.width - this .radius ; } if (this .x - this .radius < 0 ) { this .vx = -this .vx ; this .x = this .radius ; } if (this .y + this .radius > canvas.height ) { this .vy = -this .vy ; this .y = canvas.height - this .radius ; } if (this .y - this .radius < 0 ) { this .vy = -this .vy ; this .y = this .radius ; } this .draw (); window .requestAnimationFrame (() => this .move ()); } } const ball = new Ball (ctx, 50 , 50 , 20 , "blue" , 5 , 5 );ball.move ();
5、拖尾效果:
1 2 3 4 5 6 7 8 9 10 11 12 13 14 15 16 17 18 19 20 21 22 23 24 25 26 27 28 29 30 31 32 33 34 35 36 37 38 39 40 41 42 43 44 45 46 47 48 49 50 51 52 53 54 55 56 57 class Ball { constructor (ctx, x, y, radius, color, vx, vy ) { this .ctx = ctx; this .x = x; this .y = y; this .radius = radius; this .color = color; this .vx = vx; this .vy = vy; } draw ( ctx.beginPath (); ctx.arc (this .x , this .y , this .radius , 0 , Math .PI * 2 ); ctx.fillStyle = this .color ; ctx.fill (); } move ( if (Math .abs (ball.vy ) < 0.1 && ball.y === canvas.height - ball.radius ) { ctx.clearRect (0 , 0 , canvas.width , canvas.height ); this .draw (); return ; } ctx.fillStyle = "rgba(255, 255, 255, 0.5)" ; ctx.fillRect (0 , 0 , canvas.width , canvas.height ); ball.vy *= 0.99 ; ball.vy += 0.25 ; this .x += this .vx ; this .y += this .vy ; if (this .x + this .radius > canvas.width ) { this .vx = -this .vx ; this .x = canvas.width - this .radius ; } if (this .x - this .radius < 0 ) { this .vx = -this .vx ; this .x = this .radius ; } if (this .y + this .radius > canvas.height ) { this .vy = -this .vy ; this .y = canvas.height - this .radius ; } if (this .y - this .radius < 0 ) { this .vy = -this .vy ; this .y = this .radius ; } this .draw (); window .requestAnimationFrame (() => this .move ()); } } const ball = new Ball (ctx, 50 , 50 , 20 , "blue" , 5 , 5 );ball.move ();
优化问题 这里记录一些 canvas 绘图时的优化问题。
1px 问题 就像之前做的那样,绘制 1-10px 的线条。
可以发现 1px 和 2px 线条在宽度上没区别,但 1px 是灰色且模糊,还有奇数宽度的线条边缘也模糊。
这是 canvas 的栅格和绘制策略导致的:其整数坐标位于两个像素之间 ,绘制时会从坐标位置开始向两侧扩散像素 ,当坐标位置和线条(局部图形)宽度不合理时(如整数坐标奇数宽度),就会有一个将要绘制的像素被扩散到两个实际像素中,各绘制 0.5px,但物理像素不可分割 ,这时会做抗锯齿 和近似处理 ,两个像素都显示,1px 变成了 2px、黑色变成了灰色且模糊。
既然有 0.5px 的扩散,那解决方法也很简单,在需要时 坐标位置偏移 0.5px 即可。
不建议直接使用 translate 偏移整个画布,可能会导致一个图形正常了,而另一个图形反而不正常。如下图,1px 正常了,但 2px 边缘反而模糊了。
1 2 3 4 5 6 7 8 9 10 11 12 13 14 15 16 ctx.font = "20px 黑体" ; ctx.fillText ("未偏移" , 150 , 30 ); ctx.fillText ("1px" , 70 , 100 ); ctx.strokeRect (50 , 50 , 100 , 100 ); ctx.lineWidth = 2 ; ctx.fillText ("2px" , 220 , 100 ); ctx.strokeRect (200 , 50 , 100 , 100 ); ctx.translate (0.5 , 0.5 ); ctx.fillText ("偏移 0.5px" , 450 , 30 ); ctx.lineWidth = 1 ; ctx.fillText ("1px" , 370 , 100 ); ctx.strokeRect (350 , 50 , 100 , 100 ); ctx.lineWidth = 2 ; ctx.fillText ("2px" , 520 , 100 ); ctx.strokeRect (500 , 50 , 100 , 100 );
最佳实践: scale 扩大坐标系同样倍数让图形显示预期大小,这样就能正常画出任意宽度的线条。副作用较小,是比较好的做法。
1 2 3 4 5 6 7 const width = 800 ;const height = 650 ;canvas.style .width = `${width} px` ; canvas.style .height = `${height} px` ; canvas.width = 2 * width; canvas.height = 2 * height; ctx.scale (2 , 2 )
物理意义的 1px 一个栅格对应一个逻辑像素,但在高清屏幕上,一个逻辑像素会对应多个物理像素,若需要画出真正的 1px,还需要根据设备像素比 进行缩放。
window.devicePixelRatio 返回当前显示设备的物理像素分辨率与 CSS 像素分辨率之比。
1 2 3 4 5 6 const width = 800 ;const height = 650 ;canvas.style .width = `${width} px` ; canvas.style .height = `${height} px` ; canvas.width = window .devicePixelRatio * width; canvas.height = window .devicePixelRatio * height;
清晰与模糊问题 除了 1px 问题会导致图像模糊,浏览器的放大倍率也会导致图像模糊。
window.devicePixelRatio 返回当前显示设备的物理像素分辨率与 CSS 像素分辨率之比。文档 。
1 2 3 4 5 6 7 8 9 10 11 12 13 14 15 16 17 18 19 20 21 22 23 24 25 26 27 28 29 30 31 function createDprInit ( const width = canvas.width ; const height = canvas.height ; return () => { const dpr = window .devicePixelRatio || 1 ; canvas.style .width = width + "px" ; canvas.style .height = height + "px" ; canvas.width = width * dpr; canvas.height = height * dpr; ctx.scale (dpr, dpr); }; } const dprInit = createDprInit ();dprInit ();function draw ( ctx.clearRect (0 , 0 , canvas.style .width , canvas.style .height ); ctx.fillStyle = "red" ; ctx.fillRect (0 , 0 , 100 , 100 ); ctx.beginPath (); ctx.rect (150 , 0 , 100 , 100 ); ctx.stroke (); } draw ();window .addEventListener ("resize" , () => { dprInit (); draw (); });
由于现代设备的高清屏幕,默认 devicePixelRatio 通常大于 1,所以这么做还能顺带解决 1px 问题。
模糊的根本原因:
图片在拍摄完成后具有原始尺寸,对应于 canvas 就是画布尺寸,当图片被放入一个大于其原始尺寸的容器中时,图片会被放大,导致原始尺寸的一个像素实际被多个像素显示,这样就会导致图片模糊。